
A watch that slides around your wrist all day isn’t just annoying — it throws off the whole point of wearing one. If you’ve just picked up a new Seiko or your wrist size has shifted, learning how to adjust a Seiko watch band is a genuinely useful skill, and it takes less time than driving to a jeweler.
Here’s the good news: most Seiko bracelets are built for home adjustment. No soldering, no specialty machinery, just a few small tools and a steady hand.
What You Need Before You Start
Before touching the bracelet, lay down a soft cloth or microfiber towel on a flat surface. This one step prevents most of the scratches people end up regretting.
Gather these tools:
- A pin removal tool or spring bar tool
- A small watchmaker’s hammer (plastic head, ideally)
- A watch band holding block, or a folded towel as a stand-in
- Needle-nose tweezers
- Good lighting or a magnifier
None of this requires a trip to a specialty shop. A basic watch tool kit with a pin pusher and spring bar tool covers almost every adjustment you’ll need.
Identifying Your Band Type First
Not every Seiko band adjusts the same way, and this is where a lot of first-timers get stuck. Anyone who has worked on a few different Seiko models knows the fastest path to a bad afternoon is guessing instead of checking the bracelet type first.
Here’s a quick reference before you pick up any tools:
| Band Type | Adjustment Method | Tools Needed | Difficulty |
|---|---|---|---|
| Metal (pin & collar) | Remove links | Pin pusher, plastic hammer | Medium |
| Metal (screw link) | Remove links | Small flathead screwdriver | Easy |
| Rubber/Silicone (quick-release) | Remove links | None — tool-free spring bar | Very easy |
| Leather | Buckle hole | None | Very easy |
| Rubber/Silicone (standard) | Buckle or clasp | None/minimal | Very easy |
| Mesh | Sliding clasp | None | Very easy |
Metal bracelets use pin-and-collar or screw-link systems, and you’ll add or remove full links to change the length.
Leather straps are the simplest — buckle closures with multiple pre-punched holes mean you just move to a different notch.
Rubber or silicone bands usually rely on a buckle or sliding clasp, with no link removal involved. Some newer Prospex and diver-line rubber straps, though, use a quick-release spring bar system instead — you press a small lever on the underside of the spring bar and the whole strap end pops free, no tools needed at all. This is a genuinely different mechanism from the standard buckle setup, and it’s worth checking for before you assume you need a screwdriver.
Mesh bracelets, found on some Presage and dress models, don’t have removable links at all. The fit is set entirely by a sliding clasp — slide it, lock it, done.
How to Adjust a Seiko Watch Band: Removing Links Step by Step
This is the core skill, and it’s worth going slow the first time. Here’s how to adjust a Seiko watch band with a standard metal bracelet:
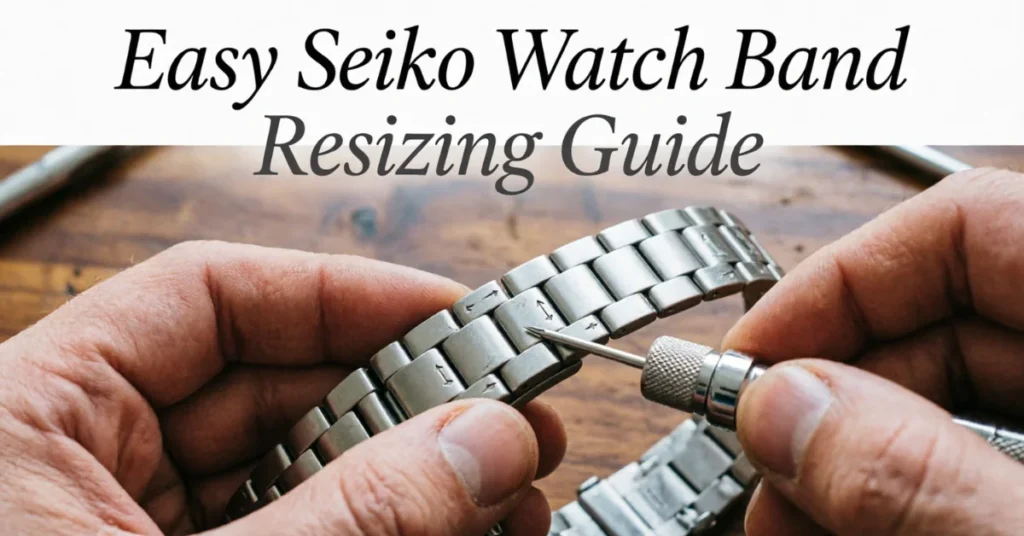
- Find the arrows. Flip the bracelet over and look at the inside of the links near the clasp. Small engraved arrows mark which links are removable and which direction the pin needs to travel.
- Secure the band. Place it in a holding block or wrap it snugly in a towel so it can’t shift while you work.
- Push the pin. Line up the pin removal tool with the small hole on the arrow side, then apply steady pressure. If it resists, a light tap with the plastic-head hammer usually does the trick — don’t force it.
- Remove links evenly. Take links out from both sides of the clasp rather than all from one side. This keeps the clasp centered on the underside of your wrist, which is where most of the comfort actually comes from.
- Reassemble. Push the pin back through from the opposite direction to lock the link back in place, and set the arrow-marked side facing the same way it started.
Keep the removed links in a small bag or box. If your wrist size changes later, or someone else inherits the watch, they’re easy to reinstall.
One detail people skip: if a pin comes out bent, or a collar looks even slightly deformed, don’t put it back in. A warped pin can work loose over time and cause a link to separate mid-wear. Spring bars and collars are cheap, standard-sized parts — replacing one is far less hassle than losing a watch off your wrist.
How Much Should You Remove? A Quick Sizing Check
Before pulling any pins, figure out roughly how much slack you’re dealing with. Fasten the bracelet as it currently sits and try sliding one finger underneath, between the band and your wrist bone.
- If two fingers fit comfortably, you likely need to remove one to two links.
- If the band is snug with one finger and some resistance, you’re probably only a half-link away — which is exactly what the micro-adjustment clasp is for.
- If the watch spins freely around your wrist, you may need two or more links removed before checking the clasp.
This finger-gap test is a rough guide, not a precise measurement, but it saves you from removing more links than you need and having to reattach them afterward.
Using the Micro-Adjustment Clasp
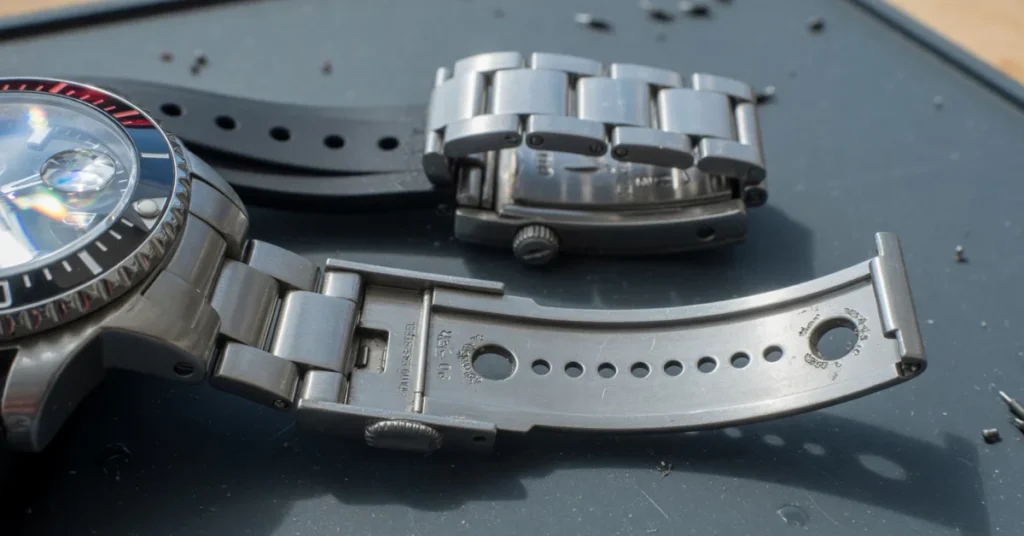
A lot of Seiko divers and field watches include a clasp with two or three micro-adjustment holes — this is the fastest fix if the fit is close but not quite right.
To use it, depress the small spring bar with the pointed end of your tool, slide the clasp extension to a different hole, and release. No link removal needed. It’s the first thing worth checking before you start pulling pins, since a half-link’s worth of slack often lives right there in the clasp.
What the Research Shows
Detailed analysis of watch adjustment guides and repair-shop practices shows a consistent pattern: most failed at-home adjustments trace back to two mistakes — forcing a pin against the arrow direction, and removing links unevenly from one side only. Watchmakers who service Seiko bracelets regularly note that the pin-and-collar system is durable enough to be adjusted multiple times without wearing out, as long as the direction indicated by the arrow is respected each time.
That durability is part of why Seiko sticks with this system across so many of its lines — it’s inexpensive to produce and forgiving for a first-timer, unlike the friction-fit pins found on some other brands.
Does Adjusting the Band Affect Water Resistance?
This is worth spelling out clearly, because it trips up a lot of dive-watch owners. Adjusting the bracelet — removing links, using the micro-adjustment clasp, swapping a strap — does not affect your Seiko’s water resistance rating, as long as you’re only working on the band itself and not opening the case back or touching the crown. Water resistance depends on the case seals, crown gasket, and case back, all of which stay completely untouched during a standard band adjustment.
The one exception: if your watch is due for a case back reseal or crown service anyway, that’s a separate job best left to a professional, and it has nothing to do with the bracelet sizing you just did.
Common Problems and How to Fix Them
Pin won’t budge: Check you’re pushing from the correct side. Pushing against the arrow, rather than with it, is the single most common reason a pin seems stuck.
Watch still feels loose after removing a link: Try the micro-adjustment clasp instead of removing another full link — a full link is often a bigger jump than you need.
Lost a spring bar or collar: These are standard sizes and cheap to replace individually, so don’t force a mismatched part back in.
Screw-link models won’t loosen: Some higher-end Seiko lines use screw links instead of pins. A small flathead screwdriver, turned counter-clockwise with light, even pressure, handles these — and they’re actually less fiddly than pins once you’ve done one.
For Different Users
If you’re doing this for the first time: practice the pin-push motion on a link you’re removing anyway before you commit to your final size — it builds the muscle memory for how much pressure is actually needed.
If you wear glasses or have limited close-up vision: a clip-on magnifier or a phone camera zoomed in on the arrow markings solves most of the “I can’t see the arrow” frustration.
If you’re adjusting a gift or a watch you didn’t buy new: check for screws hiding under the end links before assuming it’s a pin system — mixing up the two is the fastest way to strip a screw head.
If you have a quick-release rubber strap: don’t reach for a pin tool at all. Feel along the underside of the strap near the lugs for a small lever or tab, press it, and the strap end should release without any hardware.
Final Fit Check Before You’re Done
Once the bracelet is reassembled, don’t just glance at it — put the watch on and shake your wrist gently, the way you would naturally moving through a day. The clasp should stay locked and the watch shouldn’t rotate loosely around your wrist. If it does, either the clasp isn’t fully closed or you’ve got one link too many still on. This thirty-second check catches most fit mistakes before they turn into a watch sliding off during a workout or a commute.
Conclusion
Once you understand which system your bracelet uses, learning how to adjust a Seiko watch band stops feeling intimidating and starts feeling like a five-minute task. Work on a soft surface, follow the arrows, pull links evenly from both sides, check the micro-adjustment clasp before committing to a full link removal, and finish with a quick shake test. Do it once and, like most people who try it, you’ll probably wonder why you ever considered paying someone else for it.
FAQs
Can I adjust a Seiko watch band without any special tools?
A basic pin pusher tool is worth the small cost — a paperclip can work in a pinch, but it increases the risk of slipping and scratching the case. Quick-release rubber straps need no tools at all.
How many links should I remove?
Try the finger-gap test first, then remove one link from each side and try the watch on. It’s easier to remove more than to reattach ones you took out too many of at once.
Does removing links damage the watch?
No — Seiko’s pin-and-collar system is designed for repeated adjustment, and the removed pins and links are fully reusable, provided the pins aren’t bent.
Will adjusting the band affect my watch’s water resistance?
No, not if you’re only working on the bracelet or strap. Water resistance depends on the case, crown, and case back seals, none of which are touched during a standard band adjustment.
What if my Seiko has screws instead of pins?
Use a small flathead screwdriver to turn the screws counter-clockwise. The rest of the process — removing links evenly, reinstalling — stays the same.
Can a mesh bracelet be shortened by removing links?
No — mesh bands adjust only through the sliding clasp mechanism, since the mesh itself isn’t made of removable segments.