
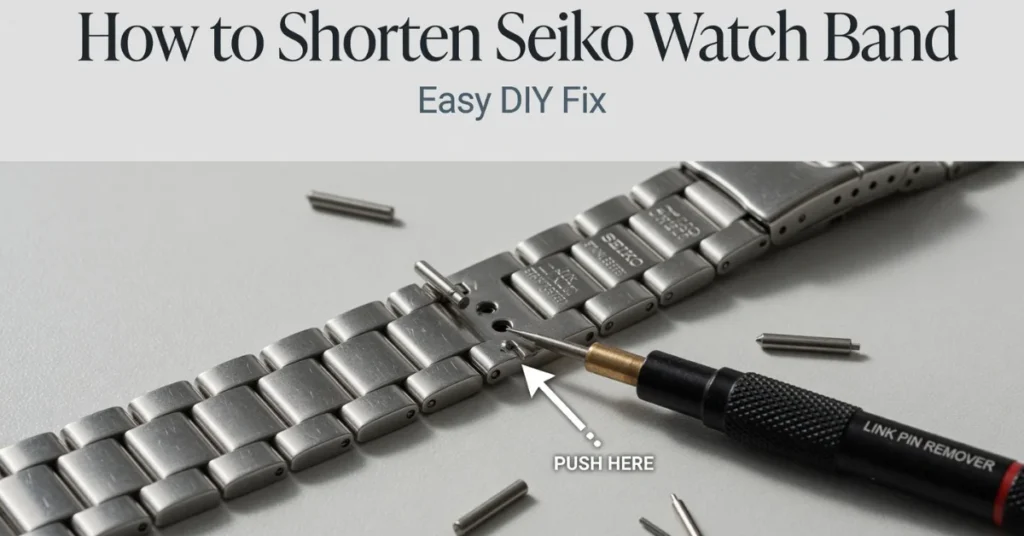
A loose Seiko sliding around your wrist isn’t just annoying. It’s the kind of thing that makes you check your watch twice as often, just to make sure it’s still there. If you’ve searched for how to shorten Seiko watch band links yourself instead of paying a jeweler, you’re in good company. Most Seiko owners end up doing this exact job at home, and it takes less time than a trip to the mall.
This guide walks through the real process, tool by tool and pin by pin, based on how Seiko’s own bracelet system is built.
How to Shorten Seiko Watch Band Links at Home
Seiko metal bracelets are made of individual links held together by removable pins. Shortening the band means taking out one or two of those links and rejoining the remaining pieces so the clasp sits centered.
Anyone who has actually done this before knows the process rewards patience more than muscle. Rushing the pin removal is where most scratches and bent parts happen.
The only way to shorten a Seiko watchband is to remove one of the many links joined together to make it, and the process stays the same regardless of the specific Seiko model you own. That consistency is actually good news. Learn it once on a Seiko 5, and you can apply it to a Prospex diver or a Presage dress watch later.
What You Need Before You Start
You don’t need a full watchmaker’s bench for this. A few small, inexpensive tools cover most home resizing jobs:
- A pin-removal tool or spring bar tool with a fine punch
- A small hammer, ideally with a plastic or nylon head
- A watch-band holding block to keep the links steady
- Needle-nose pliers or tweezers
- A soft cloth or towel to protect the case
This combination lets you detach the band from the case, punch out the internal link pins, and hold the bracelet steady while working, all without damaging the finish. A magnifying glass helps too, since the pins are genuinely tiny and easy to lose in carpet.
Seiko Band Widths by Popular Model
Before you touch a single pin, it helps to know your exact band width. Guessing here leads to buying the wrong replacement tools or straps later, and Seiko’s lineup varies more than people expect.
| Model | Band Width |
|---|---|
| SKX007 / SKX009 | 22mm |
| SKX013 / Monster series | 20mm |
| SNK809 (Seiko 5) | 18mm |
| SARB033 / SARB035 | 20mm |
| Most Seiko dive watches | 20mm or 22mm |
| Seiko dress watches | 18mm or 20mm |
The SKX007 and SKX009 models carry a 22mm lug width, while the SKX013 and Monster models sit at 20mm. Across the wider Seiko catalog, 18mm, 19mm, 20mm, and 22mm remain the most common widths, with 20mm showing up on the broadest range of Seiko 5 Sports, Presage, and Prospex models.
If your exact model isn’t listed here, measure the distance between the lugs where the band meets the case. That number is your band width, and it stays separate from how many links you remove.
Seiko Watch Band Types: Pin, Screw, and Micro-Adjust
Not every Seiko band works the same way, and this is where a lot of DIY attempts stall.
| Band Type | Tool Needed | Common Models | Difficulty |
|---|---|---|---|
| Pin-and-collar | Pin punch and small hammer | Seiko 5, Prospex, Presage | Beginner-friendly |
| Screw-type | Small flathead screwdriver | Select premium and vintage lines | Moderate |
| Micro-adjust clasp | None needed | Prospex divers, field watches | Easiest |
Pin-and-collar links. This is the classic Seiko design found on most 5-series, Prospex, and Presage bracelets. These bracelets use a pin-and-holder link system, which means each metal segment is joined to the next by an internal pin.
Screw-type links. Some models, including certain premium Seiko lines, use tiny screws instead of pins. Once the screws are removed, the process of taking out or adding links is essentially the same as with pins, just with a small flat-head screwdriver instead of a punch tool.
Micro-adjustment clasps. Newer Seiko divers and field watches often include a clasp with several small holes along the folding buckle. You’ll recognize one by flipping the clasp open and looking for a row of two to four holes near the hinge, rather than a single fixed peg. This lets you fine-tune the fit by roughly a quarter-inch without pulling out a single link, which is worth checking before you touch a pin at all.
Step-by-Step: How to Shorten Seiko Watch Band Metal Bracelets
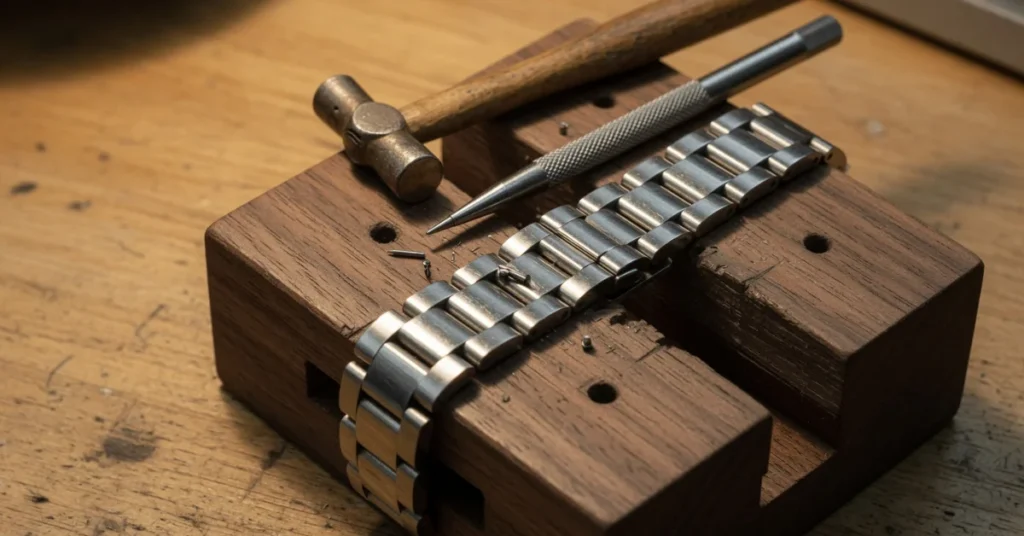
Here’s the process most people follow when learning how to shorten Seiko watch band links for the first time.
- Try it on first. Wear the watch and note exactly how loose it sits. If it rotates freely on your wrist, that’s your sign it needs work.
- Locate the removable links. Look for small arrows on the underside of the bracelet links; these mark which links can be removed and which direction the pin needs to travel.
- Avoid the links next to the clasp. Some end links are fixed in place and aren’t meant to come out.
- Set the bracelet in a holding block, arrows facing down, so the punch pushes the pin the correct direction.
- Tap the pin out gently. Align the punch pin tool with the pin hole and gently tap the top of the tool with a hammer until the pin slides free.
- Remove links evenly. Pull one link from each side of the clasp where possible, so the bracelet stays centered on your wrist rather than shifting to one side.
- Rejoin the remaining links. Push the pin back through in the opposite direction from removal, until it sits flush.
- Try it on again. Small adjustments matter here. Half a link can be the difference between snug and uncomfortable.
Anyone who has managed this kind of repair a few times will tell you the same thing: go slow on step five. Forcing a stuck pin is how people chip the link’s finish.
Shortening Leather and Rubber Seiko Bands
Not every Seiko ships on a metal bracelet. Leather straps show up often on Seiko’s dress-oriented models, particularly the Presage line, while sport and diver models tend to favor rubber or silicone.
Leather and rubber straps don’t shorten the same way metal bands do. Instead of removing links, you’re working with the buckle holes already built into the strap, or swapping the entire strap for a shorter size. If a leather band feels too long past the last hole, a local cobbler or watch shop can usually punch an extra hole safely, something not worth attempting at home with a kitchen knife.
Common Mistakes That Damage the Bracelet
A few habits show up again and again in home resizing attempts, and they’re easy to avoid once you know them:
- Using a sharp metal pin instead of a proper tool, which scratches the case
- Skipping the holding block and letting the bracelet slide during punching
- Removing links unevenly, which throws off the clasp position
- Forcing a stubborn pin instead of tapping it out gradually
- Losing the removed pins, which are needed again if the watch is resold or the wrist size changes
Keep the extracted links and pins in a small dish. That single habit saves a surprising amount of frustration later.
What the Research Shows
Detailed analysis of DIY watch repair communities shows a consistent pattern: most failed attempts trace back to skipping the holding block, not the punch tool itself. Forums dedicated to Seiko modding and repair repeatedly flag the same two issues, rushed pin removal and uneven link counts on each side of the clasp, as the leading causes of a crooked-sitting bracelet.
Watch repair professionals also note that Seiko’s pin-and-collar system, while fiddly, is actually more forgiving for beginners than screw-type systems used by some other brands, since there’s no risk of stripping a screw head.
When to Let a Professional Handle It
Home resizing works well for most Seiko owners, but there are moments to hand the job off:
- The watch has significant sentimental or resale value and you’re nervous about tools
- You’re dealing with a vintage Grand Seiko or limited edition with delicate finishing
- A screw is stuck and won’t budge without excessive force
- You’ve lost the removed pins and need replacements matched to the exact model
Most Seiko retailers offer band sizing for free or a small fee at the point of sale, and independent jewelers typically charge under twenty dollars for the same job.
Conclusion
Once you understand how to shorten Seiko watch band links, the whole process stops feeling intimidating. It’s a handful of small, repeatable steps: find the arrows, punch the pin, remove evenly, rejoin carefully. Whether you’re working on a Seiko 5 with classic pin links or a newer model with a micro-adjust clasp, the same principles apply, and knowing your exact band width ahead of time saves a second trip to the toolbox. Take it slow, keep the removed parts, and the fit you get will feel like it came from a jeweler’s bench, not a kitchen table.
FAQs
Can I shorten a Seiko watch band without special tools?
A basic pin-removal punch and small hammer are strongly recommended. A paperclip or needle can work in a pinch, but they raise the risk of slipping and scratching the case.
How many links should I remove from my Seiko band?
That depends on your wrist size, but most people remove one to three links total, split evenly between both sides of the clasp for balance.
Does shortening the band void my Seiko warranty?
No. Standard band resizing doesn’t affect the watch’s movement or waterproofing, so it typically has no impact on the manufacturer warranty.
What if my Seiko band doesn’t have visible arrows on the links?
Some models, especially Grand Seiko, use a pin-and-collar system without arrows. These usually need a specific removal tool, so checking a model-specific guide first is worth the extra few minutes.
Can I add links back later if I resize a watch by mistake?
Yes, as long as you kept the removed links and pins. That’s exactly why saving them in a small dish during the process matters.